NexLINK II Features
Hardware Improvements Over Original NexLINK
- Dedicated hardware support for simultaneous CAN, display, storage, and I/O operations
- Improved multitasking capability for smoother system operation
- Faster and more efficient communication with display and expansion devices
- Improved memory architecture allows handling of larger data loads
- Better performance when running multiple features at the same time
- Designed for future NexGenEFI expansion and advanced features
CAN Interfaces
CAN1 – ECU Interface
- Dedicated CAN port for vehicle ECU communication
- Supports standard and extended CAN frames
- Used for receiving engine and vehicle data
CAN2 – Expansion Interface
- Dedicated CAN port for NexGenEFI expansion devices
- Supports NexNODE, NexEGT, NexGPS II, and future modules
- Supports multi-device expansion via CAN hub
- CAN Termination controlled via Pro Edition
Low-Side Drivers
- Quantity: 3
- Software-controlled outputs
- Used to control relays, indicators, or external devices
High-Side Driver
- Quantity: 1
- Used for vehicle starter control
- Supports:
- Manual start via touchscreen press-and-hold
- Automatic start via firmware logic
- Supports:
Analog Inputs
Fuel Level Input
- Analog input designed for fuel level sender
- Provides real-time fuel level measurement
Digital Inputs
High Beam Input
Detects high beam activation state
Turn Signal Inputs
- Left turn signal input
- Right turn signal input
DIM Input
- Detects headlight activation
- Automatically reduces display brightness
Programmable Voltage Outputs
User-Configurable Power Outputs
- Quantity: 2
- Firmware-controlled programmable voltage outputs
- Supported output modes include:
- Linear 0–5V output
- Fixed 5V output
- Fixed 3V output
- User-defined voltage output (firmware controlled)
Designed to power sensors, expansion devices, or provide analog control signals.
PINS:
+12v SW – 12v switched input
GND – GOOD GROUND PLEASE
CAN1L – CAN Port 1. CAN LOW from EFI system here
CAN1H – CAN Port 1. CAN HIGH from EFI system here
CAN2L – CAN Port 2. CAN LOW from NexGenEFI device or SUPPORTED device
CAN2H – CAN Port 2. CAN HIGH from NexGenEFI device or SUPPORTED device
LSD3 – Good for 10A continuous using 16AWG wire. Low Side Driver 3 from relay *(See sample relay config below)
LSD2 – Good for 10A continuous using 16AWG wire. Low Side Driver 2 from relay *(See sample relay config below)
LSD1 – Good for 10A continuous using 16AWG wire. Low Side Driver 1 from relay *(See sample relay config below)
LSDGND – GOOD GROUND PLEASE for corresponding LSD1-3
HSIN+12v – 12v switched input
HSOUT – 12v OUT to Starter solenoid
ANOUT1 – 0-5v output (NOT CURRENTLY ENABLED. Will enable with firmware update)
ANOUT2 – 0-5v output (NOT CURRENTLY ENABLED. Will enable with firmware update)
GND – GOOD GROUND PLEASE (not needed if using any LSDGND)
HBEAM – High beam 12v input
LTURN – Left turn signal 12v input
RTURN – Right turn signal 12v input
DIM – I would route the headlight 12v here. Once headlights are turned on the display will DIM to the user defined setting in the Visuals menu.
FUEL – Fuel sending unit input. RESISTANCE wire, NOT POWER!
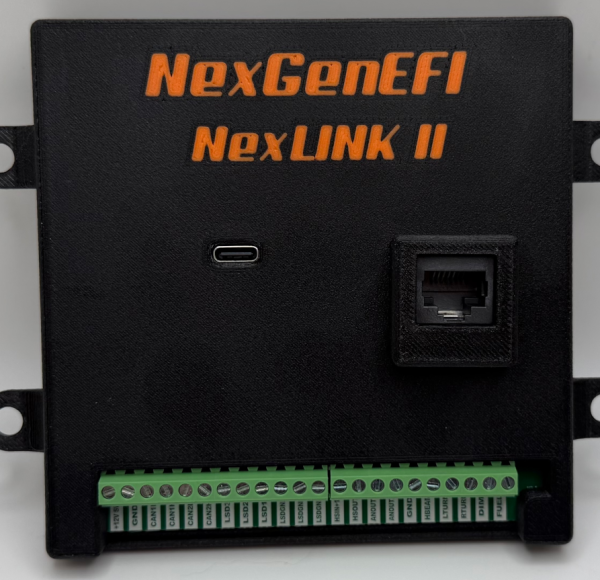
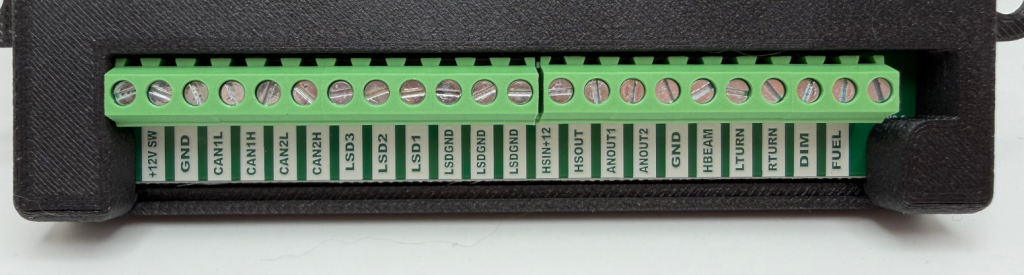
* LSD1, LSD2, LSD3 example wiring
Here are some generic relays from Amazon.


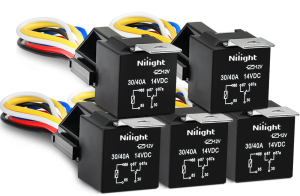
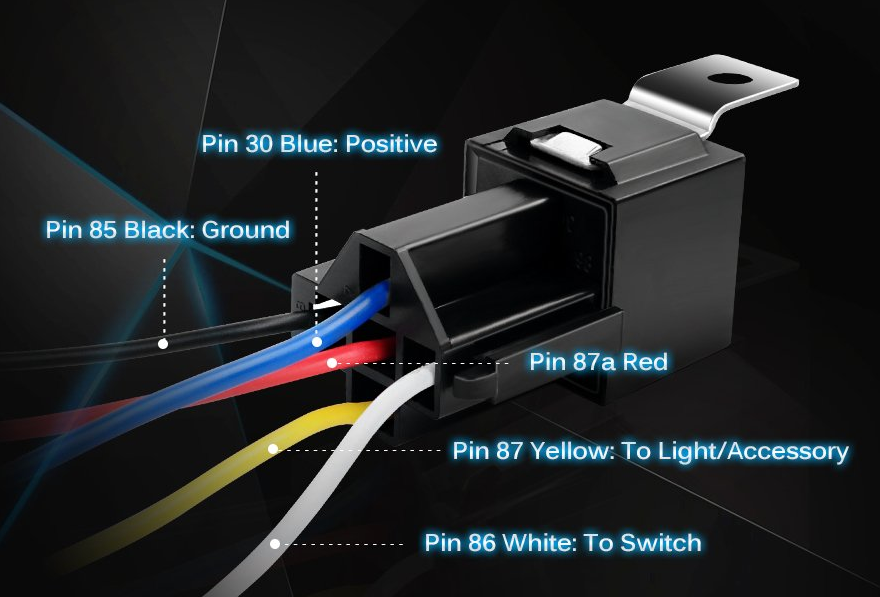
These are your standard 5 wire relays. If you were to use this with the NexLINK II the BLACK WIRE pin 85 would go into one of the LSD1, LSD2 or LSD3 green screw terminals. Then you would wire the LSDGND (any) to a GOOD GROUND! Once wired in, you will want to configure the input on the Pro Edition.

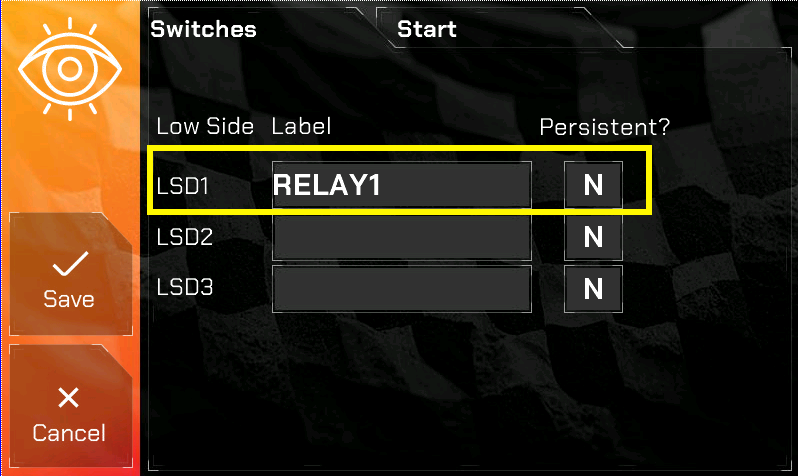
In the following screen, if you were configuring Low Side Driver 1 (LSD1) you will give it a name of 6 characters. We’ll just call it “RELAY1” for this example. Persistent (when set to Y) means when you PRESS the button (which you’ll see in a subsequent screen shot), it STAYS ON/OPEN, otherwise it is a MOMENTARY switch.

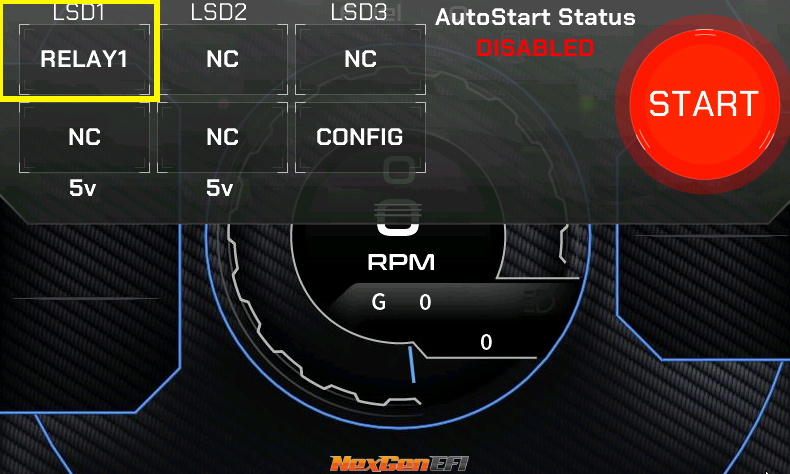
Once configured and the selected layout is displayed you can swipe down from the top to access the Virtual Switch Panel. You might need to touch to top of the screen for 1 second and while touching, swipe down. Below you see LSD1 we just configured. Touch it. Do it. Listen to the clicky clicky of your relay!

High Side Driver – Starter Control (HSIN+12v, HSOUT)
Important: Use of this feature is the sole responsibility of the user. Improper configuration may result in damage to the starter, flexplate, flywheel, or related components. NexGenEFI, LLC is not responsible for damage resulting from improper configuration or misuse of this feature.
HSIN+12v – Wire in 12v SWITCHED Power
HSOUT – Goes to the 12v IN on your Starter Solenoid
Manual Start / AutoStart configuration
There are two ways to use the START button:
1. Manual Start (Press and Hold)
Press and hold the START button on the Pro Edition display. The starter will remain engaged for as long as the button is held. Release the button to stop cranking.
2. AutoStart
Press and release the START button. NexLINK II will automatically engage the starter and attempt to start the vehicle based on your configured AutoStart settings.
EXAMPLE SETTINGS for the NexGenEFI Turbo Camaro for AutoStart:

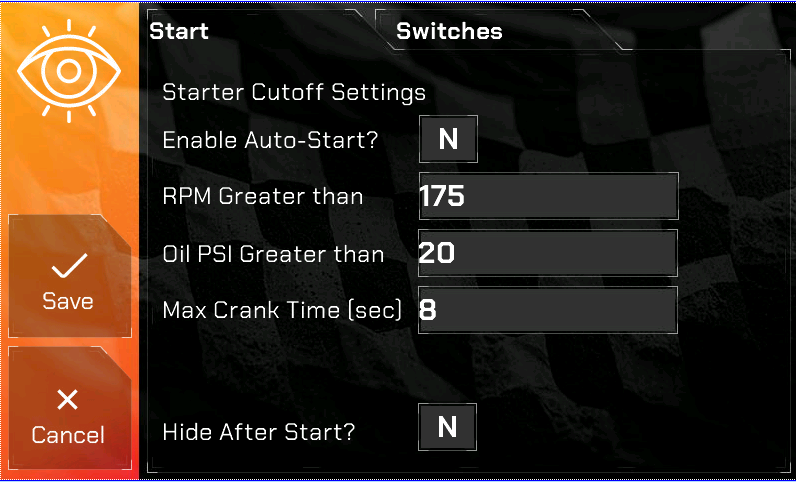
Enable Auto-Start? If set to “N” then the NexLINK II WILL NOT AUTOSTART your vehicle. You will need to PRESS AND HOLD the START button.
RPM Greater Than – This value should be set above your engine’s normal cranking RPM, but below its idle RPM. For example, the turbo Camaro cranks at approximately 135 RPM, and once the engine starts, RPM quickly rises above 900 RPM. Setting this value to 175 RPM ensures that NexLINK II will stop cranking as soon as the engine starts and exceeds the “RPM Greater Than” value, while preventing premature disengagement during normal cranking.
Oil PSI Greater than – This is currently not in use but will be in a future update. This is a safety check. If oil PSI reaches this value (and RPM target is met), the starter disengages as a successful start. If oil PSI stays below this value, the starter will continue cranking until the max crank time runs out.
Max Crank Time (sec) – How long in seconds the NexLINK II will keep cranking during AutoStart. If the engine does not start within this time, the NexLINK II will stop engaging the starter.
Hide after Start? – Once the vehicle is started, after 5 seconds the Virtual Switch Panel will hide.